A fire in your dust collector can be both dangerous and devastating to your manufacturing facility. If a fire does occur, it’s important to repair the damage so you can resume production and take preventative steps as quickly as possible.
Post-fire inspection generally looks for specific damage and the likely cause of the fire so that future fires can be prevented and avoided.
Damage Inspection can be broken down as follows:
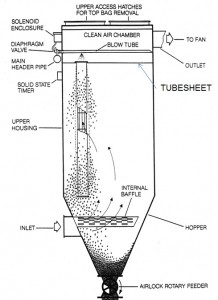
- Tubesheet
The tubesheet is prone to heat damage. If it becomes warped then the filters will not seal. Any deviation of more than ¼” in a 24” span would be considered excessive.
That is, place a two foot long straight edge at any location on the tubesheet and if the distance from “high spots” to “low spots” is over ¼” then you may have a sealing issue and the tubesheet may need to be replaced.
- Hopper
Look for accumulations of debris and, especially, molten metal in the bottom of the hopper or in any discharge equipment. Nylon Cage Venturis may melt and cause debris to stick to the hopper sidewalls, in the hopper valley angles, or in the blades of a rotary airlock, reducing the ability for the dust collector to discharge collected dust. Be sure to remove as much of the debris as possible out of the collector.
- Entryways
Take a look at the access doors, ports, roof hatches, and other external entry points. Search for warpage that might prevent doors and ports from properly sealing even after new gasket has been installed. Door panels may need to be straightened or replaced if damage is excessive.
- Bolted flanges
Check any bolted flanges, paying special attention to the tubesheet to housing connection and hopper to housing connection. Replace damaged gasketing as needed.
The original flange gasket over time (or due to fire heat) may become brittle, powdery, or hard. If this happens, cracks, breaks, or gaps may occur which would allow leakage of outside air and moisture to be drawn into the dust collector during operation.
A good way to check door seals is to have a short, very flat piece of metal that can be slid between the flanges to check for gaps. Another means is to look for daylight through the flange connections when inside the unit. If you find any of these gaps, replace the damaged gasketing as needed.
- Compressed air piping
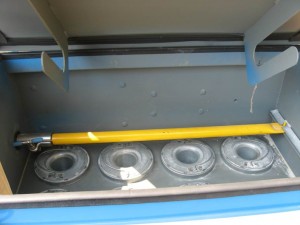
Inspect clamps, hoses, tubing, and other compressed air piping parts for damage and replacement. This can include wall grommets, Morris pipe clamps, and the diaphragm valve/solenoid valve tubing.
- Pulse Pipes
While fire damage in pulse pipes is rare, abrasive wear might be present in any dust collector that has operated for an extended period of time. Look for damage and replace as needed.
- Housing walls
If you find any excessive distortion or permanent deflection of the housing walls, it may negatively affect the operation of the unit. Warpage that creates contact with the installed filter bags will cause premature wear of those filters. In addition, excessive distortion of stiffeners will lower the allowable design pressure of the housing. Warped or distorted walls or stiffeners generally cannot be straightened so replacement of the housing may be required in extreme cases.
- Downstream equipment
Look at the downstream equipment, paying close attention to component parts like the fan. Damage would most likely be confined to debris, but fan bearings could be affected if there was a fire in the fan as well or molten debris adhered to the fan blades causing an unbalanced condition.
- Rupture panels (explosion vents)
Check the rupture panels, or explosion vents, to ensure they are not damaged or weakened. Replace or repair as needed.
- Overall inspection
In general, look for anything that just “doesn’t look right”, or that might seem to cause a problem with the unit operation once it is put back into service.
Preventative Inspection:
- Scorch damage
Look for scorch damage, or discoloration, of the paint and where this occurs. Discoloration high on the housing might mean a fire on the filter bags while low could indicate a fire that started in the hopper.
For a fire that occurs in the higher reaches of the dust collector, you will need to determine the source. For example, a spark from the dryer could have started the flame or even a static electrical discharge at the filters. Grounded filters, if not already in use, may be warranted.
- Ductwork
Look for similar damage to any paint on the ductwork coming to the baghouse. This could indicate the fire started in the ducting, or prior to the ducting, and was drawn into the baghouse by the fan action. Isolation or suppression equipment in the ductwork might be warranted.
- Rupture panels (explosion vents)
If the baghouse experienced a fire, but not an explosion, it would not be uncommon that the rupture panels/doors did not function. They should be inspected for damage and replaced if necessary.
- Witnesses
Talk to employees, maintenance personnel, etc. to see what their recollections are about what occurred. The point is to try to isolate the starting point of the fire and address suppression and control at that location. Keep in mind all equipment should be equipped with a means to isolate it from other equipment in the event of a fire or explosion.
Remember that, above all, common sense is the best damage control and preventative tool you can use. If anything doesn’t seem right to you with any part of your dust collector or you are concerned about the effectiveness of your preventative measures, give Sly a call at 800-334-2957 and our Aftermarket Department will supply you with a complete list of replacement parts for your unit.
Tags: dust collector, Blog, dust collector fire, dust collector inspection


