At Sly we often receive questions from callers about the right way to change-out the filter bags on their dust collectors. While it’s a detailed process, learning how to change-out your envelope filter bags will save you both time and money otherwise spent replacing them earlier than necessary. Whether you have a reverse-air Dynaclone, an envelope Shaker collector, or a pulse-clean Pactecon, many of these tips apply to all bag styles.
Preparing to Change-Out the Bag:
 Sly envelope style collectors have a typical envelope-style dust wall, although depending on your specific model type, it may have larger sections or even several tiers. This includes dust wall pins to hold the bags in place, studs for securing dust wall clips, and an angle or channel in the back for bag tension.
Before performing any maintenance on your dust collector, first make sure you complete all your company’s safety, lock-out, and tag-out procedures. Afterward, remove the front and rear doors from the dust collector, loosen or cut the old eye bolts, remove the dust wall clips, and take out the old filter bags. However, make sure to maintain some of the hardware such as the rear mullions and bag spacers.
Change-Out Checklist:
- Replace the Gasket
- Install the Single-Wire Cloth Strip
- Install the Filter Bag
- Install the 2nd Bag
- System-Specific Steps
- Tension the Bags
- Final Inspection
Replace the Gasket:
An important step people often neglect when changing envelope filter bags on Sly dust collectors is to remove the old dust wall gasket and replace it with a new one, both on top and bottom of the frame. Scrape any residue from the old dust wall gasket off the frame using a wire brush or putty knife prior to putting the new dust wall gasket in place.
Install the Single-Wire Claw Strip:
Once you've replaced the dust wall gaskets on both the top and the bottom of the cell, the next step is to install the single-wire cloth strip. Position it on the dust wall pins located on the end of the unit. Make sure that the single-wire cloth strip is on the inside of the frame next to the filter bags.
Install the Filter Bag:
Before you can install the filter bags into the dust collector, you’ll need to put the rear mullion into the back of the filter bag. Dynaclone and Pactecon bags feature an independently-sewn pocket for the rear mullion. However, Sly shaker dust collectors don't have that pocket, so you’ll have to insert the rear mullion at the top and drop it all the way to the bottom of the filter bag.
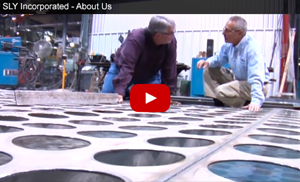
For a demonstration using a envelope filter bag, watch our YouTube video.
Now you're ready to install the envelope filter bag into your dust collector. The rear mullion is positioned such that the pin extends through the bottom hole of the filter bag. At this point you're going to need an assistant at the rear of the dust collector.
- Begin by putting the filter bag into the dust collector and attaching the top ear to the top dust wall stud.
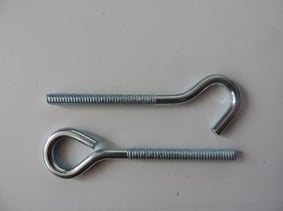
- The person at the rear of the unit will have already positioned the eye bolt, spring, washer, and nut assembly. Fish the S-hook off the back mullion and connect it to the eye bolt.
- With the eye bolt still loosely secured in the rear, the person in the front can now put the lower ear over the lower dust wall stud and begin putting the flaps over the dust wall pins.
- The next step is to install the first front mullion. Put the mullion pins through the holes on the filter bags, from the top down to the bottom. Once all the pins are through the flap, grab the front mullion and twist it into position between the first two studs.
Install the Second Bag:
Installation of the second bag is identical to that of the first. Insert the bag into the cell, placing the ear over the top dust wall studs. As before, have your assistant at the rear of the dust collector connect the eye bolt to the rear mullion. Now place the lower ear over the lower dust wall stud and fold the flap of the second bag over the flap of this first bag and insert these front mullion pins through the second bag.
Continue this assembly procedure for all the bags in this section. As before, put the front mullion pins through the holes in the flap, top to bottom. Once inserted, twist the front mullion into place between the two studs on the top and the two studs on the bottom.
Once you reach the edge of your dust collector or this cell, one of two things will occur. You’ll either reach the outside wall or you'll reach the end of one section and the beginning of another section. If it happens to be the outside wall, you'll take a single-wire cloth strip, place it over the dust wall pins against the frame, and then take the flap of the last bag and place it over the dust wall pins.
If instead it happens to have an adjoining cell, place the double-wire cloth strip over the dust wall pins, the flap of the last bag, and over the pins as well. Then take the double-wire cloth strip and place it over the pins on the adjoining cell.
System-Specific Steps:
- If you're re-bagging a Shaker collector or a Pactecon, you're ready to put your dust wall clips on, insert your spacers, and put the final tension on the filter bags at the rear of the collector.
- If on the other hand you're re-bagging a Dynaclone, you're going to have to put some armor guard components on the face of the bags to protect them from the traveler as it goes back and forth. To learn more, visit slyinc.com and watch our armor guard installation video.
Tension the Bags:
To tension the bags, draw the nut down on the eye bolt until the compression or the dimension of the compressed spring reaches a specific distance. On a Pactecon PC-100, it's one-and-three- quarter inches. On a 200-series Pactecon, a Dynaclone, and a Shaker filter, it's three- and-a-half inches.
Final Inspection:
Now that all your bags are properly tensioned, do a final overall inspection and replace the front and rear access panels. During the change-out, you may have noticed some broken or worn components, such as spacers, eye bolts, springs, or front and rear mullions. All of these are available for overnight delivery from Sly through our after-market department. However, prior to a change-out, we recommend having a few of these wear components on hand.
The Dust Collection Experts
Now you should be able to change-out your dust collector bags with a minimum of hassle, and they’ll also last longer. For a full demonstration of a bag change-out, watch our YouTube video. And don't forget, visit us at slyinc.com for all your air pollution control needs.

Dust Collector Repair, dust collector inspection, bag filter cleaning